
Bronze : the ancestral lost wax technique
- Aug 25, 2023
- 3 min read
Michel Bassompierre works closely with the foundry Barthelemy Art in the Drôme.
This foundry play an invaluable role in the creation of the sculptures, as it is responsible for the prodigious task of transforming a plaster cast into a bronze work.
To do this, it is necessary to go through several stages and pass through several hands.
STEP 1 Plaster sculpture
Michel Bassompierre creates a plaster sculpture from his clay model.

STEP 2 Production of an elastomer mould under a coat of plaster
The mould maker applies liquid elastomer in successive layers to the plaster model. When the resulting thickness is between 5 and 10 mm, 3 to 4 cm of plaster is added on top. The resulting mould is opened along the joint lines.
This mould can be made up of a single part if the piece is simple, in which case it is called a "sock mould", but if the piece is more complex, different parts or even a system of keys will be needed.
Some artists may bring their own clay modelling.

STEP 3 Waxing
Liquid wax is applied to the mould to a thickness of 3 to 4 mm: this layer of wax determines the thickness of the final bronze. The thinner the casting, the better the quality.
If a hollow bronze is required, a core of refractory material is cast into it.

STEP 4 Creating a supply and drainage system
Various wax rods with very specific roles need to be welded onto this wax print:
- The jets: pour the bronze into the mould
- Vents: to evacuate air and gases from the operation
- The drains: to evacuate the molten wax

STEP 5 The cylinder
The wax sculpture is placed in a metal cylinder, complete with all the inlets and outlets. The cylinder is filled with liquid refractory plaster, which will mould itself perfectly to the shape of the work.

STEP 6 The oven
The cylinder is placed in an oven at 300 degrees for several hours so that the wax melts. It will be recovered and reused for a future sculpture.
Once the wax has disappeared, the oven temperature is adjusted to 600 degrees to bake the mould

STEP 7 Melting
The cylinder that comes out of the oven is ready to receive the molten bronze, which reaches around 1000 degrees.
The caster must estimate the volume of bronze required, and will melt ingots weighing between 5 and 10 kg in a crucible that will be placed in the furnace. Once the bronze is molten, it must be poured into the cylinder in a single operation.

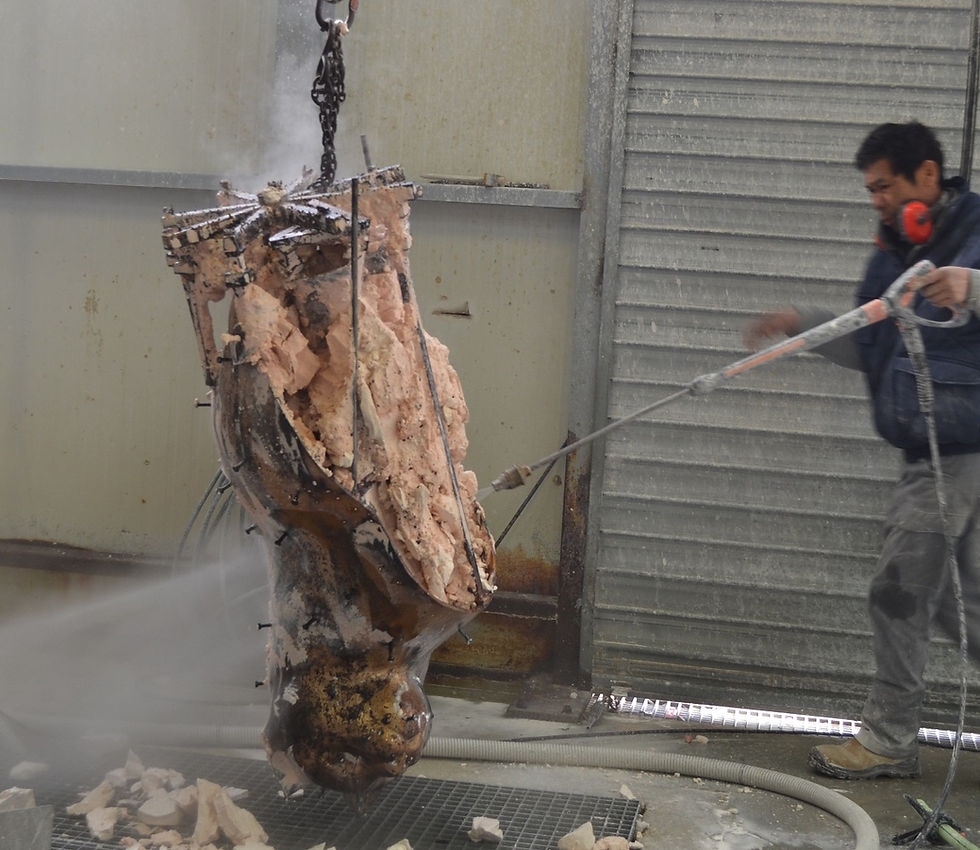
STEP 8 Stripping
Once the cylinder has cooled, the refractory plaster is removed using a high-pressure water jet to remove the bronze.
The same technique is used to remove the core inside.
At this stage, we have a sculpture with vents that are still visible.
STEP 9 Welding and deburring
The deburrer removes all the excess metal from the work.
If the work is large, the bronze print is made up of several parts. This is where the welder comes in.

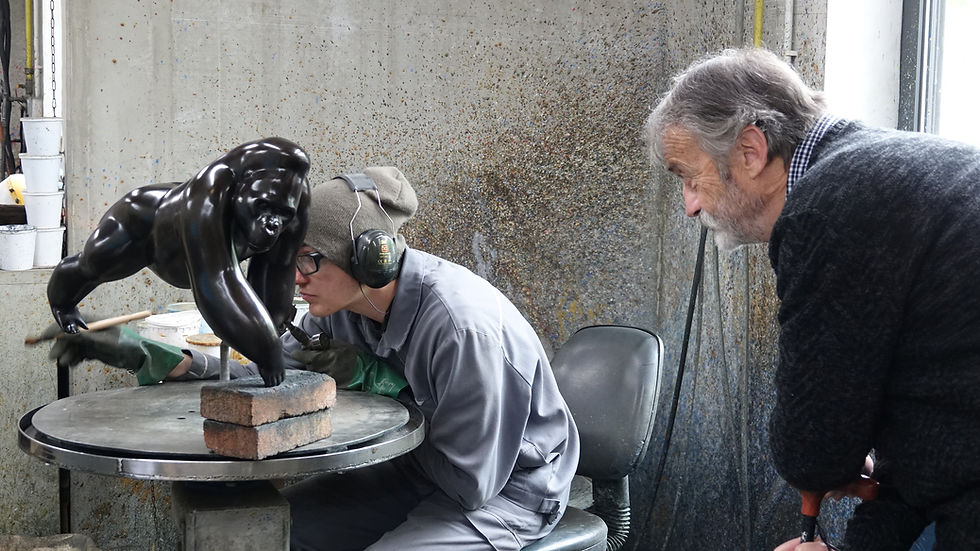
STEP 10 Chasing
Now that the bronze is in its raw state, it is the chiseller's turn to make the work smooth and free of imperfections (plugging air bubbles, raising certain details, correcting defects, etc.).

STEP 11 Sanding
The purpose of this stage is to prepare the piece for the patina in the best possible conditions. This stage makes the surface of the sculpture even.

STEP 12 The patina
The last little hands are those of the patina artist, who glides his brush over the sculpture.
The patina is created by oxidising the surface of the metal with a mixture of acid and various oxides. The patinist's skill lies in knowing how to measure the quantity and number of coats to apply. It is not easy to apply only a partial coat of patina.
A wax is then applied to protect and reveal the patina. This is when it takes on its true colour.
Patience is required to find the right patina that will give the sculptor complete satisfaction.

The work can finally leave the foundry and pass through the animal sculptor Michel Bassompierre's lair, before moving on to the various galleries.


Comments